

Soda Can Home Decor DIY: Transform Trash into Treasure!
Have you ever looked at a pile of empty soda cans and thought, “There has to be something more I can do with these”? I know I have! For centuries, resourceful people have found creative ways to repurpose everyday items, turning the mundane into something beautiful and functional. From ancient civilizations crafting tools from discarded materials to modern-day upcycling movements, the spirit of innovation and sustainability has always been a driving force.
But why should *you* care about soda can home decor DIY? Well, beyond the obvious environmental benefits of reducing waste, it’s a fantastic way to express your creativity, personalize your living space, and save money! Let’s face it, home decor can be expensive. But with a little ingenuity and some readily available soda cans, you can create unique and eye-catching pieces that reflect your personality. Plus, it’s incredibly satisfying to say, “I made that!” when guests admire your handiwork.
In this article, I’m going to share some of my favorite soda can home decor DIY tricks and hacks. Whether you’re a seasoned crafter or a complete beginner, there’s something here for everyone. Get ready to unleash your inner artist and transform those empty cans into stunning decorations that will add a touch of eco-friendly charm to your home!
Upcycled Soda Can Flowers: A Sparkling Home Decor Project
Hey there, fellow crafters! Ever look at a pile of empty soda cans and think, “There has to be something more I can do with these?” Well, you’re in luck! Today, I’m going to show you how to transform those humble aluminum cylinders into stunning, shimmering flowers that will add a unique touch to your home decor. This project is not only a fantastic way to recycle, but it’s also surprisingly easy and incredibly rewarding. So, gather your supplies, and let’s get started!
What You’ll Need:
* Empty soda cans (the more, the merrier!)
* Scissors (a sturdy pair is recommended)
* Craft knife (for scoring, optional but helpful)
* Ruler or measuring tape
* Pencil or marker
* Hot glue gun and glue sticks
* Round-nosed pliers (for shaping petals)
* Wooden skewers or floral wire (for stems)
* Acrylic paint (optional, for adding color)
* Glitter (optional, for extra sparkle)
* Clear sealant spray (optional, to protect the paint and glitter)
* Cutting mat or protective surface
Safety First!
Before we dive in, let’s talk safety. Aluminum cans can have sharp edges, so it’s crucial to be careful throughout this project. Always cut away from yourself, and use a cutting mat to protect your work surface. If you’re using a craft knife, be extra cautious. And, of course, exercise caution when using a hot glue gun.
Preparing the Soda Cans
This is a crucial step, so pay close attention! We need to clean and flatten the cans before we can start cutting out the petals.
1. Rinse and Dry: First, thoroughly rinse out your empty soda cans with soap and water. Make sure to remove any sticky residue. Let them dry completely before moving on. This prevents any unwanted smells or stickiness during the crafting process.
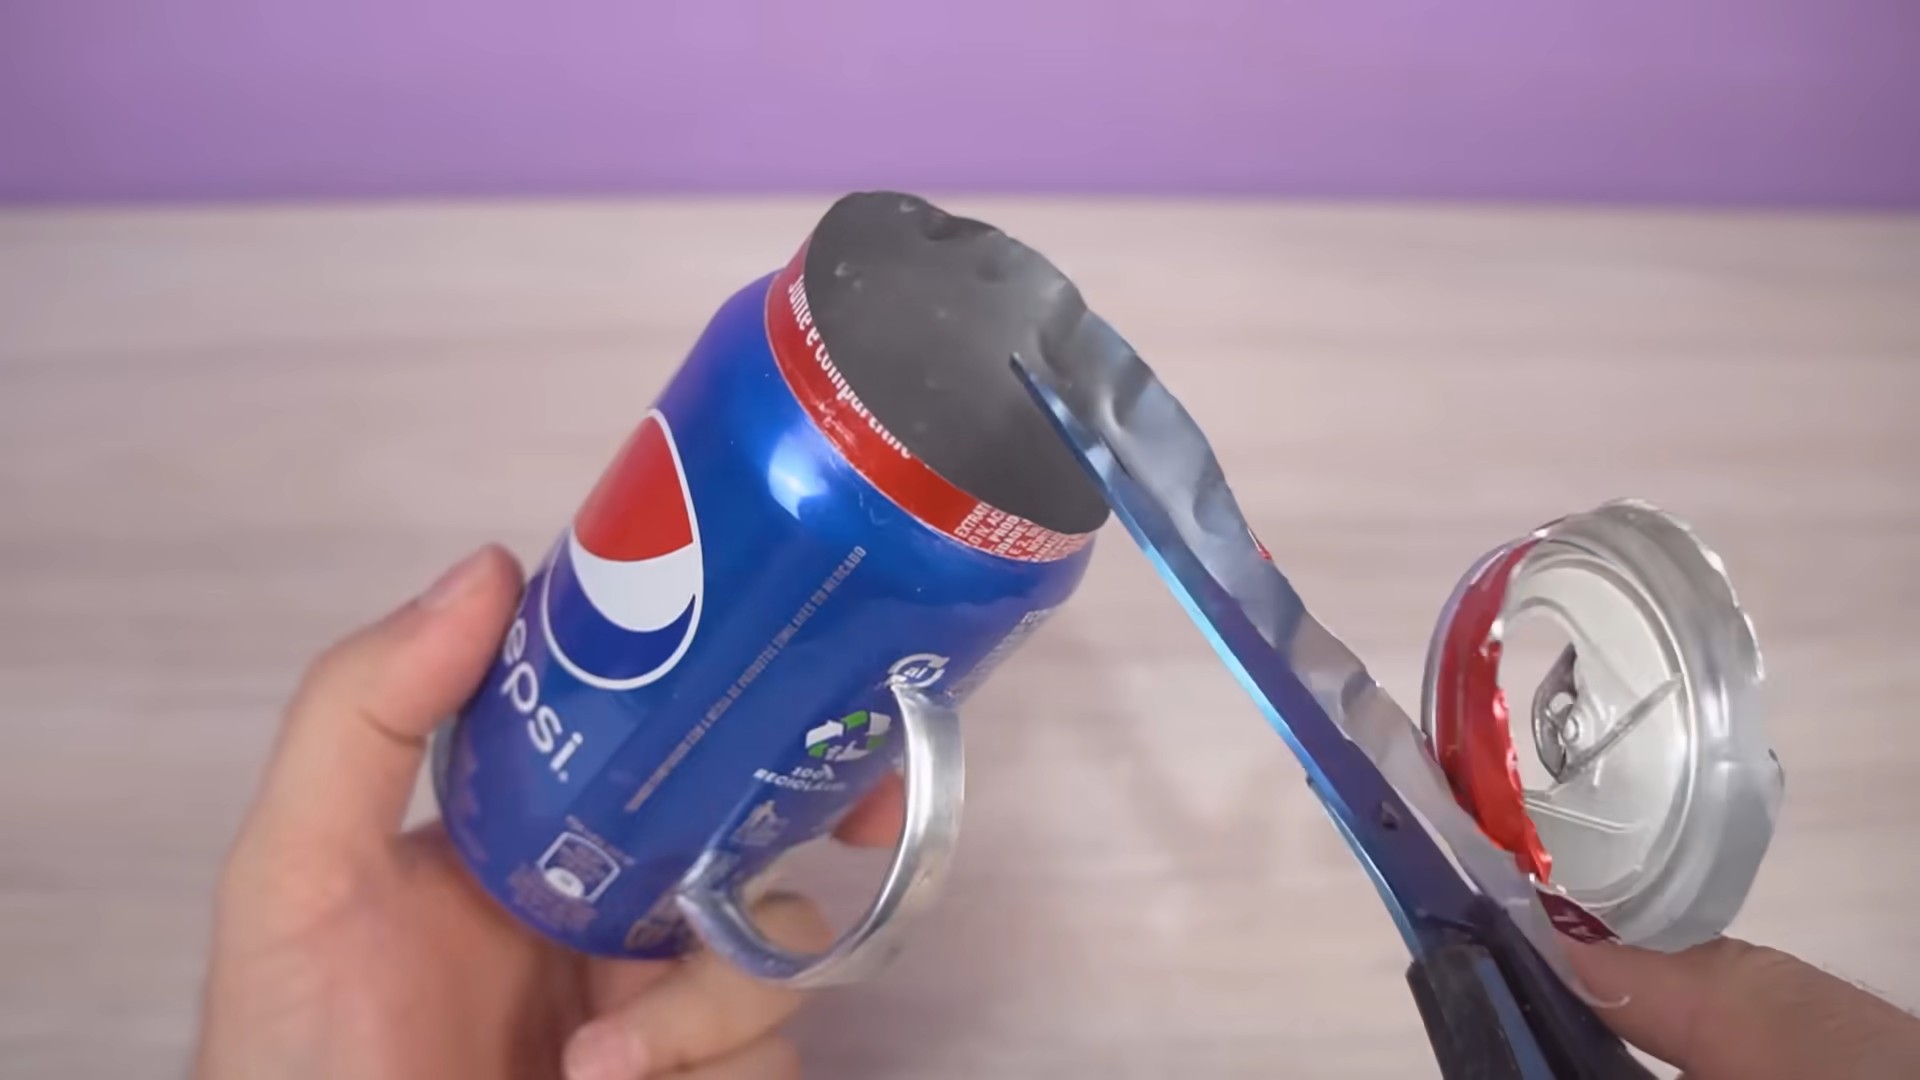
2. Open the Cans: There are a couple of ways to open the cans safely. You can use a can opener to remove the top and bottom, or you can carefully use scissors to cut around the top and bottom rims. I prefer the scissor method, as it gives me more control. Just be careful of those sharp edges!
3. Flatten the Cans: Now comes the fun part (sort of!). Carefully cut down the side of the can to create a flat sheet of aluminum. Use your scissors to trim any jagged edges and make the sheet as smooth as possible. You can gently flatten the aluminum sheet by pressing it between two heavy books for a few hours, or you can carefully use a rolling pin. Be careful not to bend or crease the aluminum too much.
Creating the Petals
This is where the magic happens! We’ll be cutting out different sizes and shapes of petals to create a realistic flower.
1. Draw Petal Templates: On a piece of paper or cardboard, draw different petal shapes and sizes. I like to have three sizes: small, medium, and large. Experiment with different shapes – some can be rounded, others more pointed. Think about the type of flower you want to create. For a rose, you’ll want more rounded petals. For a daisy, you’ll want more pointed ones.
2. Trace and Cut: Place your petal templates onto the flattened aluminum sheets and trace around them with a pencil or marker. Make sure to leave some space between the petals to minimize waste. Once you’ve traced all your petals, carefully cut them out using your scissors. Remember to cut away from yourself!
3. Shape the Petals: This is where the round-nosed pliers come in handy. Use the pliers to gently curve and shape the petals. You can curl the edges inward or outward to create a more realistic look. You can also use your fingers to gently bend and shape the petals. Experiment with different techniques to see what works best for you. For a more dramatic effect, you can even use a lighter to gently heat the edges of the petals (adult supervision required!). This will cause the aluminum to curl and create a unique, organic look. Be extremely careful when using a lighter, and only do this in a well-ventilated area.
Assembling the Flower
Now it’s time to bring your petals together and create a beautiful flower!
1. Create the Center: Start by creating the center of the flower. Take a few of the smallest petals and roll them tightly together to form a bud. Secure the base of the bud with a dab of hot glue.
2. Add the Inner Petals: Begin adding the medium-sized petals around the center bud, overlapping them slightly. Secure each petal with a dab of hot glue at the base. Work your way around the bud, adding more petals until you achieve the desired fullness.
3. Add the Outer Petals: Finally, add the largest petals around the outside of the flower, again overlapping them slightly. Secure each petal with hot glue. Make sure the petals are evenly spaced and that the flower looks balanced.
4. Attach the Stem: Once you’re happy with the shape of your flower, attach the stem. You can use a wooden skewer or floral wire. Apply a generous amount of hot glue to the base of the flower and insert the skewer or wire. Hold it in place until the glue sets.
Adding the Finishing Touches (Optional)
This is where you can really let your creativity shine!
1. Painting: If you want to add color to your flowers, now’s the time to paint them. Use acrylic paint and apply several thin coats, allowing each coat to dry completely before applying the next. You can paint the entire flower or just the edges of the petals.
2. Glittering: For extra sparkle, sprinkle glitter onto the wet paint. You can use different colors of glitter to create a unique and eye-catching effect.
3. Sealing: Once the paint and glitter are dry, you can apply a clear sealant spray to protect them and prevent them from flaking off. This will also give your flowers a nice, glossy finish.
Creating Variations
The possibilities are endless when it comes to creating different types of soda can flowers! Here are a few ideas to get you started:
* Roses: Use rounded petals and curl them inward to create a classic rose shape.
* Daisies: Use pointed petals and arrange them in a circular pattern around a yellow center.
* Sunflowers: Use large, oval-shaped petals and paint them yellow. Add a brown center made from felt or cardboard.
* Abstract Flowers: Don’t be afraid to experiment with different shapes and sizes of petals. You can create unique and abstract flowers that are truly one-of-a-kind.
Displaying Your Soda Can Flowers
Now that you’ve created your beautiful soda can flowers, it’s time to display them! Here are a few ideas:
* Vase: Arrange your flowers in a vase to create a stunning centerpiece.
* Wall Art: Attach your flowers to a canvas or piece of wood to create a unique wall art piece.
* Garland: String your flowers together to create a festive garland.
* Gift Toppers: Use your flowers to decorate gifts for friends and family.
Tips and Tricks
* Use different types of soda cans: Experiment with different colors and designs of soda cans to create a variety of looks.
* Don’t be afraid to experiment: The best way to learn is to experiment. Try different techniques and see what works best for you.
* Practice makes perfect: The more you practice, the better you’ll become at creating soda can flowers.
* Have fun! This is a creative project, so relax and enjoy the process.
I hope you enjoyed this tutorial! I can’t wait to see what beautiful soda can flowers you create. Happy crafting!
Conclusion
So, there you have it! Transforming humble soda cans into stunning home decor is not just a fun craft project; it’s a testament to the power of creativity and resourcefulness. We’ve shown you how to take something destined for the recycling bin and give it a vibrant new life as a decorative piece. This soda can home decor DIY project is a must-try for several compelling reasons.
First and foremost, it’s incredibly budget-friendly. Instead of shelling out money for expensive decorations, you’re repurposing materials you already have on hand. This makes it an accessible craft for everyone, regardless of their budget. Secondly, it’s eco-conscious. By upcycling soda cans, you’re reducing waste and contributing to a more sustainable lifestyle. You’re not just decorating your home; you’re making a positive impact on the environment.
But beyond the practical benefits, this DIY project is about unleashing your inner artist. It’s about taking a simple idea and running with it, experimenting with different colors, patterns, and techniques to create something truly unique and personal. The possibilities are endless!
Consider these variations to further personalize your soda can creations:
* Painted Wonders: Experiment with different paint finishes. Matte paints offer a sophisticated, understated look, while glossy paints add a vibrant pop of color. Metallic paints, like gold or silver, can instantly elevate your creations to a more luxurious level. Don’t be afraid to mix and match finishes for a truly unique effect.
* Textured Delights: Add texture to your soda can creations using various techniques. Apply a layer of gesso before painting to create a slightly rough surface. Use stencils and textured pastes to create raised patterns. Or, glue on small beads, sequins, or other embellishments for a touch of sparkle and dimension.
* Themed Decor: Tailor your soda can decor to specific themes or holidays. Create festive ornaments for Christmas, spooky decorations for Halloween, or patriotic accents for the Fourth of July. Use themed stencils, colors, and embellishments to bring your vision to life.
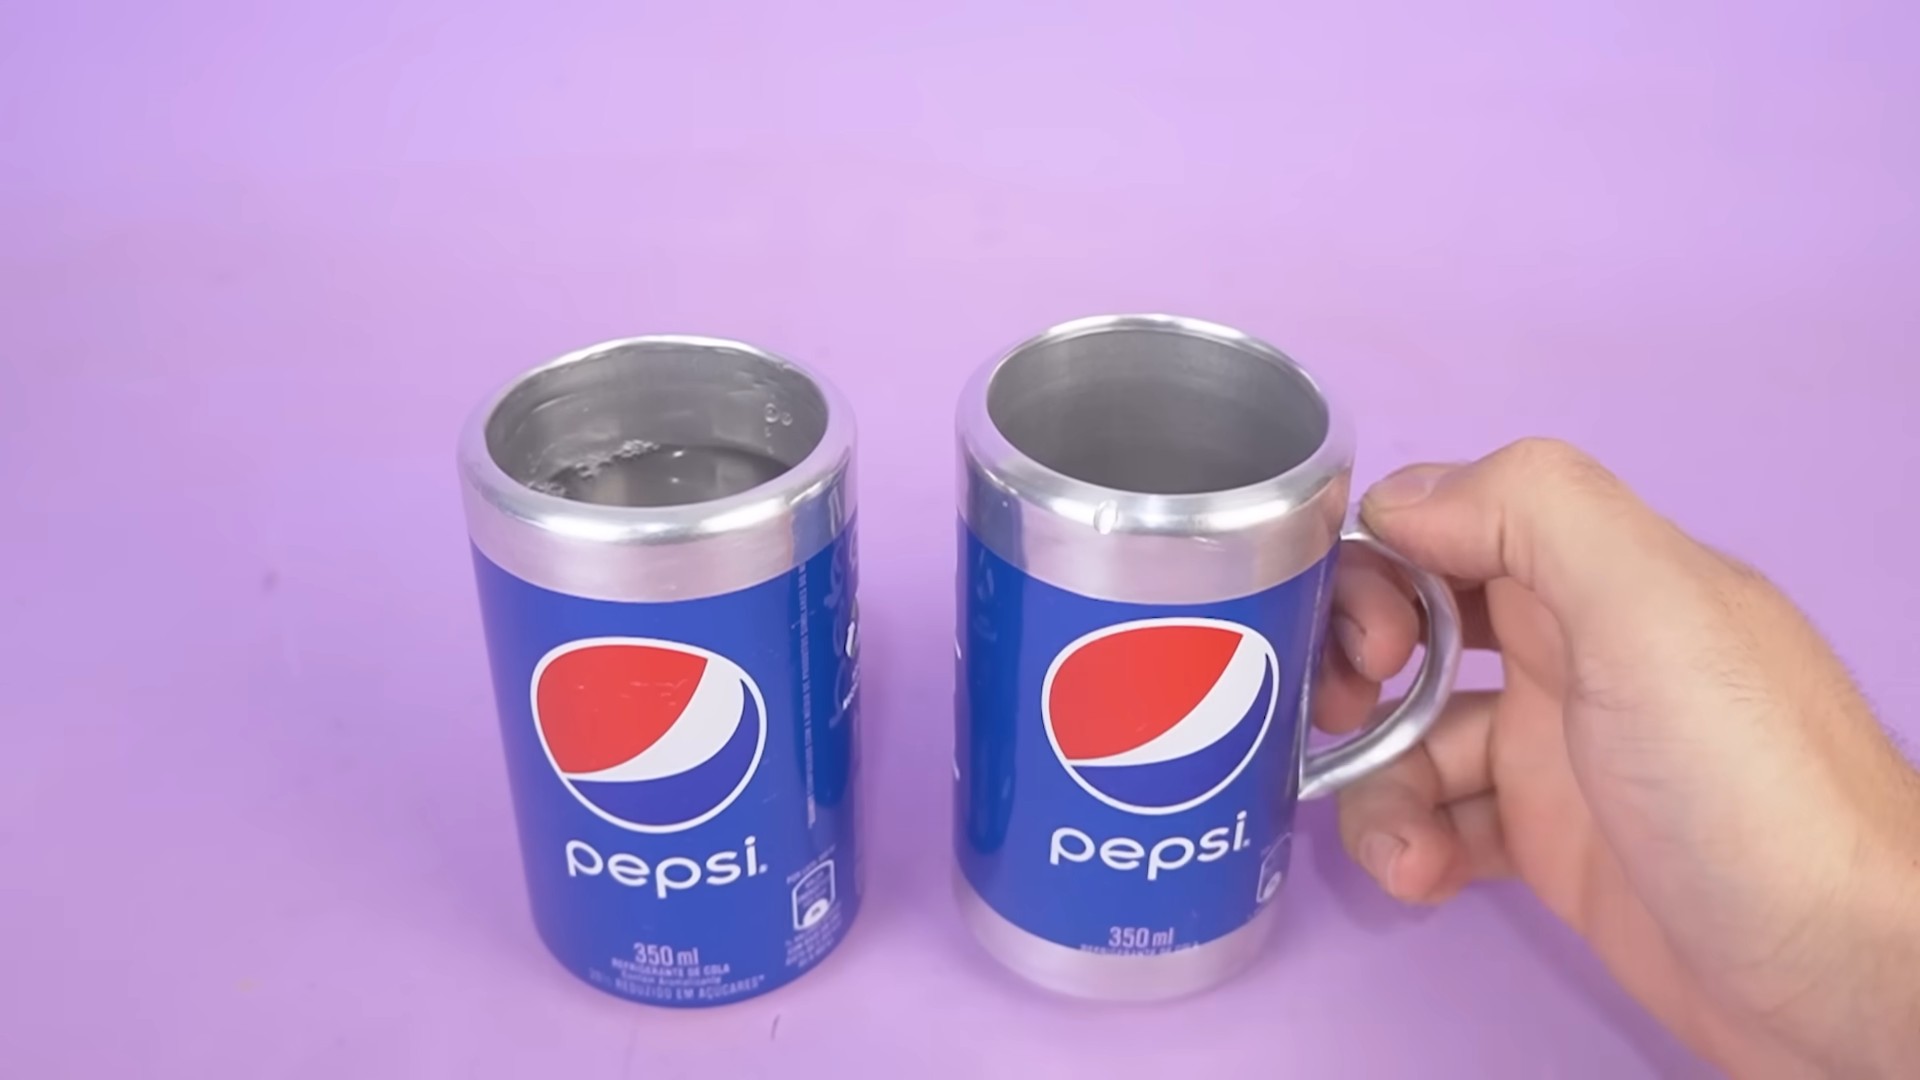
* Functional Art: Think beyond purely decorative pieces. Transform soda cans into functional items like pen holders, small planters, or even unique lighting fixtures. With a little ingenuity, you can create beautiful and practical items for your home.
* Collaborative Creations: Make it a family affair! Gather your loved ones and work together on a soda can decor project. It’s a fun and engaging way to spend time together while creating something beautiful.
We are confident that you will find this DIY project both rewarding and enjoyable. It’s a fantastic way to express your creativity, add a personal touch to your home decor, and contribute to a more sustainable future.
So, grab those soda cans, gather your supplies, and get crafting! We can’t wait to see what you create. Don’t forget to share your finished projects with us on social media using #SodaCanDecorDIY. We’re eager to be inspired by your unique creations and celebrate your DIY success! Let’s transform the ordinary into the extraordinary, one soda can at a time. Remember, the beauty of this soda can home decor DIY lies in its simplicity and adaptability. Let your imagination be your guide, and you’ll be amazed at what you can achieve.
FAQ
What kind of soda cans work best for this project?
Any standard aluminum soda can will work perfectly for this DIY project. However, cans with fewer dents and scratches will generally yield a smoother and more aesthetically pleasing final product. Before you start, make sure to thoroughly clean and dry the cans to remove any residue or stickiness. Different sizes of cans can also be used to create variety in your decor.
Is it safe to cut soda cans? Are there any precautions I should take?
Yes, it is generally safe to cut soda cans, but it’s crucial to take necessary precautions to avoid injury. Aluminum can have sharp edges after being cut. Always use appropriate cutting tools, such as sturdy scissors or a craft knife, and work on a stable surface. Wear gloves to protect your hands from cuts. After cutting, carefully smooth out any sharp edges with sandpaper or a file. If you are working with children, adult supervision is essential. Consider using safety scissors designed for crafting.
What kind of paint should I use for decorating soda cans?
Acrylic paints are an excellent choice for decorating soda cans. They adhere well to the aluminum surface, dry quickly, and are available in a wide range of colors and finishes. You can also use spray paint, but make sure to apply it in a well-ventilated area and use multiple thin coats to avoid drips and runs. For added durability, consider applying a clear sealant or varnish after painting to protect the finish. Chalk paint can also be used for a more rustic look, but it will require a sealant to prevent chipping.
How do I prevent the paint from chipping or scratching off the soda cans?
To prevent paint from chipping or scratching, proper preparation is key. Start by thoroughly cleaning the soda cans with soap and water to remove any grease or dirt. Lightly sand the surface of the cans with fine-grit sandpaper to create a better surface for the paint to adhere to. Apply a primer specifically designed for metal surfaces before painting. After painting, apply a clear sealant or varnish to protect the finish. Handle the finished decor items with care to avoid scratching or damaging the paint.
Can I use these soda can decorations outdoors?
While soda can decorations can be used outdoors, they may not be as durable as decorations made from weather-resistant materials. Exposure to the elements, such as rain, sun, and wind, can cause the paint to fade, chip, or peel. To prolong the life of your outdoor soda can decorations, use weather-resistant paints and sealants. Consider placing them in sheltered areas, such as under a porch or awning, to protect them from direct exposure to the elements. Regularly inspect the decorations for signs of wear and tear and reapply sealant as needed.
What are some other creative ways to use soda cans for home decor?
Beyond the basic techniques described in the article, there are many other creative ways to use soda cans for home decor. You can create intricate sculptures, wind chimes, candle holders, or even mosaic tiles. Cut the cans into strips and weave them together to create baskets or wall hangings. Use cookie cutters to create decorative shapes from the aluminum and string them together to make garlands. The possibilities are truly endless! Let your imagination be your guide and experiment with different techniques to discover new and exciting ways to transform soda cans into beautiful and unique home decor items.
How do I safely dispose of the scraps of aluminum after cutting the soda cans?
Safety is paramount when dealing with sharp aluminum scraps. The best way to dispose of them is to collect them in a sturdy container, such as a metal can or a thick plastic bin. Wear gloves when handling the scraps to protect your hands from cuts. Once the container is full, seal it tightly and label it clearly as “Sharp Aluminum Scraps.” Check with your local recycling center to see if they accept aluminum scraps. If not, dispose of the container in your regular trash, making sure it is securely sealed to prevent any accidental injuries.
Can I involve children in this DIY project?
Yes, children can definitely be involved in this DIY project, but with proper supervision and age-appropriate tasks. Younger children can help with tasks such as cleaning the soda cans, sorting colors, or applying paint with supervision. Older children can assist with cutting and shaping the aluminum, but always under close adult supervision. Ensure that children understand the safety precautions and use appropriate tools and protective gear. This project can be a fun and educational way to teach children about recycling, creativity, and the importance of safety.
Where can I find more inspiration for soda can home decor DIY projects?
The internet is a treasure trove of inspiration for soda can home decor DIY projects. Websites like Pinterest, Instagram, and YouTube are filled with tutorials, ideas, and examples of stunning soda can creations. Search for keywords such as “soda can crafts,” “aluminum can art,” or “upcycled home decor” to find a wealth of information and inspiration. You can also find inspiration in magazines, books, and craft fairs. Don’t be afraid to experiment and adapt ideas to create your own unique designs.

Leave a Comment